
The Great Ruby Hunt
Part III - Crafting the Ring
In The Great Ruby Hunt I and II, the focus was on how I helped a client find the perfect Ruby for her custom engagement ring. Once the Ruby had been found, the next steps were to finalize the design and craft the ring.
When custom designing a jewel the best place to start is with jewels and design elements you already admire. After reviewing our design portfolios and the rings at our gallery, the client identified three elements that she particularly liked.
1. Engraving - She was drawn to the rich elegance and intricate patterns of our hand-engraved rings She admired the the flowing Flowers and Scrolls pattern and our dramatic Engraved Elegance design, but she absolutely fell in love with the cascading richness of our Regal Elegance design.
2. Side Stones - She also admired the way the trilliant diamonds were set flush with the shoulders in our Cool Ice ring. She liked how the trilliants were tucked slightly beneath the center diamond and appeared to flow into the platinum band of the ring.
3. Ring Shape - Last but not least, she loved the low profile of the gemstones in our Cool Blue Design as well as the tapered width of the band. She enjoys outside activities and felt the low profile of the ring would be perfect for her active life style.
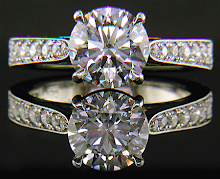
We discussed these and other elements and came up with a ring design inspired by the elegant, dramatic rings of the Art Deco era. The resulting ring is pictured above.
Once the design had been finalized, the next step was to find the perfect pair of trilliant-cut diamonds. I examined about twenty pairs of trilliants. The diamonds needed to complement one another, and also the center Ruby.
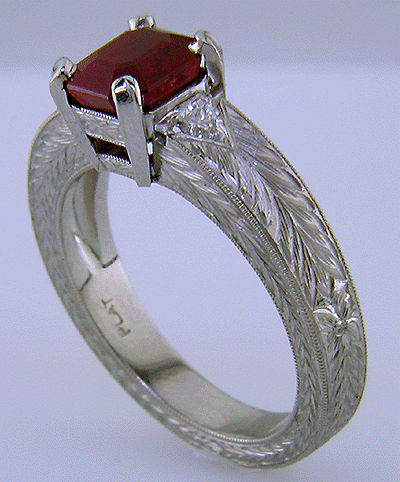
I wanted the trilliants to fit within the beveled corners of the Ruby. The goal was to create a continuous line from the slanted corners of the Ruby, along the straight edges of the trilliants, to the outer points of the diamonds burnish set in the band of the ring. This would create a dramatic tapered look which would perfectly accent the elegant shape of the Ruby.
After matching up a stunning pair of D-color trilliant-cut diamonds, it was time to begin crafting the ring.
When creating a special ring the quality of the workmanship is as important as the beauty of the gemstones and the design. In creating this ring we worked with three different craftsmen - a master platinum smith to build the ring, a talented hand engraver and an experienced gem setter. Each is a master of their craft and a talented artist in their own right.
Our platinum smith crafted the ring in three steps:
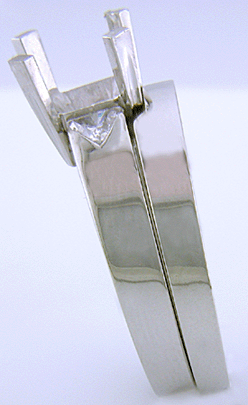
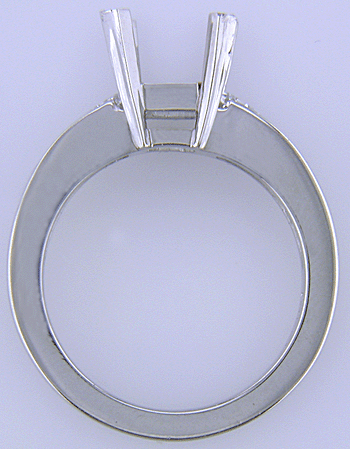
First, he took a small solid block of platinum and, like a sculptor, carved out the upper and lower galleries of the mounting. By carving the setting from a single piece of platinum our platinum smith was able to shape and adjust the mounting so that it perfectly matched the shape and size of the Ruby. This approach assured that the mounting is sturdy and securely protects the gemstone.
Next, the platinum smith crafted the prongs from flat-edge platinum stock. He polished the prongs along their length to create a narrow taper towards the base. We then asked the platinum smith to add a slight crease or recess along the outer surface of the prongs. This added a little contrast to the bright surfaces of the prongs and emphasized the linear design.
Finally, our platinum smith crafted the band (or "shank") of the ring. He hand built the band with flat surfaces and slightly rounded edges to give the engraver a good working surface. At the slightly flared shoulders of the band, he carved triangular recesses for the trilliant diamonds. The recesses were shaped so the diamonds would angle slightly downward and flow into the pattern of the engraving. Because the ring was hand-crafted we were able to adapt the design to the specific size and shape of the gemstones and pay close attention to the small details.

Our client also wanted to create a wedding band in the same style. So, our platinum smith crafted a platinum band that matched the flat surfaces and profile of the ring. Then he carefully carved out a section at the top of the band, so that the engagement ring would nestle up closely against the band. The best time to create a contoured wedding band is when the engagement ring is being crafted. This assures the best fit between the two rings.
When wearing a straight band against an engagement ring, there is often friction between the two rings resulting in possible wear to the setting. A custom-fit contoured band greatly reduces the friction between the rings.
Notice how closely fitted the two rings rest against each other. This creates a more comfortable wearing ensemble, but it also helps to minimize the wear and tear on the two rings.
Hand crafting a ring is an "old school" technique that requires exceptional (the finest) craftsmanship and patience. The time it takes to create a truly custom ring from scratch is rewarded in the final jewel.
If you have any questions about how we work with clients on custom projects, please send me an email.


No comments:
Post a Comment