The Jeweler's Eye
My photo
I am a jewelry designer and gemologist. I love creating beautiful heirloom jewelry for clients all over the world. In this blog, I feature many of my designs and current projects as well as articles about colored gemstones, diamonds and antique jewelry. As a historian and lover of antique and estate jewelry, I am often inspired by jewels from the past.

Tuesday, May 27, 2008

Golden Metamorphoses Brooch


A special event should be celebrated with a special jewel. I recently designed this brooch for a client to celebrate his wife's birthday.

The focal point of the brooch is a jet black Drusy Psilomelane that shimmers and sparkles with a myriad of tiny crystals. The bezel setting for the Psilomelane and the frame of the brooch are crafted in brightly polished 18kt yellow gold. The crystallized 24kt gold body of the brooch forms the wings of this stunning design.

We bezel set Fancy Intense Pink diamonds in 18kt rose gold and Fancy Intense Yellow diamonds in 18kt yellow gold to complement the warm hue of the crystalline gold and capped off the design with a colorless diamond set in platinum.


It is my belief that the back of a jewel should be as exciting and beautifully crafted as the front. The 18kt gold back of the brooch is pierced with a dramatic arabesque pattern. Custom designing and hand crafting a fine jewel like this allows me to ensure that there is no skimping on the design, craftsmanship or materials. The true quality of an exceptional jewel can always be seen in the small, often hidden details.


If you would like more details on this dramatic brooch,
please visit The Golden Metamorphoses Gallery


Monday, May 26, 2008

The Great Ruby Hunt - Part IV


The Great Ruby Hunt

Part IV - The Final Touches


In Parts I, II and III we selected the gemstones and began crafting a custom engagement ring and wedding band for a client. Now the ring and band are ready for the final touches - hand engraving the bright platinum surfaces and setting the center Ruby.

I discussed with the client several patterns of engraving as well as different engraving techniques (bright cut, relief, punch, etc.). She decided on our Regal Elegance pattern interspersed with small engraved flowers and surrounded by a milgrained border. This combination of design elements nicely complements the shape of her ring and band, as seen in the photos below.

Platinum Art Deco Style Ruby and Diamond Engraved Ring


If you closely examine the above photo you will see small striations or vertical lines along the inside of the center setting. These are minute saw marks from when our platinum smith hand-crafted the mounting - an indication that the setting was hand made, not cast.

Platinum Art Deco Style Engraved Contoured Wedding Band


The wedding band was hand engraved to match the engagement ring. The above photo shows the flowing leaf-like pattern along the sides of the band, as well as the cut-out at the apex of the band which allows a close fit with the engagement ring.

Platinum Art Deco Style Ruby and Diamond Engraved Ring


As mentioned earlier, the client wanted an engagement ring that was wide on top, but she was concerned that the ring might look and feel heavy on her small hand. I suggested tapering the width and depth of the band towards the base of the ring. We also polished a slight bevel around the inside edges of the ring to create a more comfortable fit. This solution accomplished the best of both worlds: our client would have the bold look of a wider ring along with a comfortable fit. The photos above and below show the taper of the width and depth of the ring towards its base.

Platinum Art Deco Style Ruby and Diamond Engraved Ring


When the hand engraver had completed his task, the next craftsman, the gem setter, was ready to set the center Ruby. First he carved a small groove (or "seat") along the inside wall of each prong. This "seat" creates a niche to support the outermost edge (or "girdle") of the gemstone.

A skilled setter creates a seat that is just deep enough to properly support the gemstone, but not so deep that it weakens the prong. An over cut prong will compromise the integrity of the setting. After the seats were carefully cut our gem setter placed the Ruby within the prongs and carefully pushed over the tip of each prong until the Ruby was securely and safely held in its setting.

The Ruby is set slightly above the trilliant diamonds so that it neatly overlaps the diamonds, creating a brilliant line of sparkling gemstones. Just what you want for a beautiful and unique custom engagement ring and wedding band.


Platinum Art Deco Style Ruby and Diamond Engraved Ring


After assembling a fabulous layout of gemstones, working with our client through various design options, and hand crafting the ring, the final result is a stunning engagement ring and wedding band that not only showcases her beautiful Ruby, but also features a dazzling pair of trilliant diamonds and beautiful hand engraving. Her ring and band are truly miniature masterpieces......works of Art!

There are many steps involved in creating a beautiful jewel of lasting quality and beauty, but the finished piece is definitely worth the time and care we take to create a ring you will admire and enjoy for many years.

Tell me what you think of this design. If you have any questions about Rubies, the ring, or how the design can be tailored to your own lifestyle and taste, just send me an email !

Judi

The Great Ruby Hunt - Part III

Platinum Art Deco Style Ruby and Diamond Engraved Ring


The Great Ruby Hunt


Part III - Crafting the Ring


In The Great Ruby Hunt I and II, the focus was on how I helped a client find the perfect Ruby for her custom engagement ring. Once the Ruby had been found, the next steps were to finalize the design and craft the ring.

When custom designing a jewel the best place to start is with jewels and design elements you already admire. After reviewing our design portfolios and the rings at our gallery, the client identified three elements that she particularly liked.

1. Engraving - She was drawn to the rich elegance and intricate patterns of our hand-engraved rings She admired the the flowing Flowers and Scrolls pattern and our dramatic Engraved Elegance design, but she absolutely fell in love with the cascading richness of our Regal Elegance design.

2. Side Stones - She also admired the way the trilliant diamonds were set flush with the shoulders in our Cool Ice ring. She liked how the trilliants were tucked slightly beneath the center diamond and appeared to flow into the platinum band of the ring.

3. Ring Shape - Last but not least, she loved the low profile of the gemstones in our Cool Blue Design as well as the tapered width of the band. She enjoys outside activities and felt the low profile of the ring would be perfect for her active life style.

We discussed these and other elements and came up with a ring design inspired by the elegant, dramatic rings of the Art Deco era. The resulting ring is pictured above.

Once the design had been finalized, the next step was to find the perfect pair of trilliant-cut diamonds. I examined about twenty pairs of trilliants. The diamonds needed to complement one another, and also the center Ruby.

I wanted the trilliants to fit within the beveled corners of the Ruby. The goal was to create a continuous line from the slanted corners of the Ruby, along the straight edges of the trilliants, to the outer points of the diamonds burnish set in the band of the ring. This would create a dramatic tapered look which would perfectly accent the elegant shape of the Ruby.

After matching up a stunning pair of D-color trilliant-cut diamonds, it was time to begin crafting the ring.

When creating a special ring the quality of the workmanship is as important as the beauty of the gemstones and the design. In creating this ring we worked with three different craftsmen - a master platinum smith to build the ring, a talented hand engraver and an experienced gem setter. Each is a master of their craft and a talented artist in their own right.

Our platinum smith crafted the ring in three steps:

First, he took a small solid block of platinum and, like a sculptor, carved out the upper and lower galleries of the mounting. By carving the setting from a single piece of platinum our platinum smith was able to shape and adjust the mounting so that it perfectly matched the shape and size of the Ruby. This approach assured that the mounting is sturdy and securely protects the gemstone.

Next, the platinum smith crafted the prongs from flat-edge platinum stock. He polished the prongs along their length to create a narrow taper towards the base. We then asked the platinum smith to add a slight crease or recess along the outer surface of the prongs. This added a little contrast to the bright surfaces of the prongs and emphasized the linear design.

Finally, our platinum smith crafted the band (or "shank") of the ring. He hand built the band with flat surfaces and slightly rounded edges to give the engraver a good working surface. At the slightly flared shoulders of the band, he carved triangular recesses for the trilliant diamonds. The recesses were shaped so the diamonds would angle slightly downward and flow into the pattern of the engraving. Because the ring was hand-crafted we were able to adapt the design to the specific size and shape of the gemstones and pay close attention to the small details.


Platinum Art Deco Style Ruby and Diamond Engraved Ring


Our client also wanted to create a wedding band in the same style. So, our platinum smith crafted a platinum band that matched the flat surfaces and profile of the ring. Then he carefully carved out a section at the top of the band, so that the engagement ring would nestle up closely against the band. The best time to create a contoured wedding band is when the engagement ring is being crafted. This assures the best fit between the two rings.

When wearing a straight band against an engagement ring, there is often friction between the two rings resulting in possible wear to the setting. A custom-fit contoured band greatly reduces the friction between the rings.

Platinum Art Deco Style Ruby and Diamond Engraved Ring


Notice how closely fitted the two rings rest against each other. This creates a more comfortable wearing ensemble, but it also helps to minimize the wear and tear on the two rings.

Platinum Art Deco Style Ruby and Diamond Engraved Ring


Hand crafting a ring is an "old school" technique that requires exceptional (the finest) craftsmanship and patience. The time it takes to create a truly custom ring from scratch is rewarded in the final jewel.


If you have any questions about how we work with clients on custom projects, please send me an email.

Sunday, May 25, 2008

The Great Ruby Hunt - Part II


The Great Ruby Hunt


Part II - The Hunt Continues


We were working with a client who wanted to create a striking Ruby and Diamond engagement ring. After evaluating a number of beautiful Rubies and assembling a strong grouping, the next step was to review the gemstones with the client and help her select the best Ruby for the ring.

The color of a gemstone can be described in terms of Hue, Tone and Saturation. Part of my task is to evaluate these components of color and help client's understand the subtle differences. My goal is to make sure that the client can make an educated, informed decision when purchasing a gemstone.

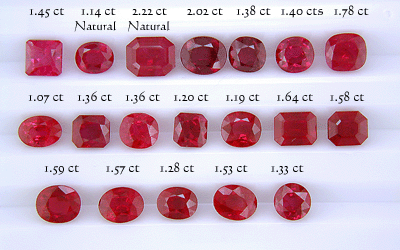
The human eye has difficulty seeing and remembering subtle differences in color, especially if you are looking at only one or two gemstones at a time. The best way is to examine and compare a number of gemstones all at once .... the more gems the better! Below is the dazzling array of Rubies I assembled for my client to review.


With a large number of gemstones the initial lineup can be overwhelming. After all, each of the gems is beautiful ... just in different ways.

The client was looking for a Ruby with a classic pure Red color. So, first I helped the client identify the Ruby that was the purest Red. Then we identified the Rubies with the strongest orangy Red and purplish Red hues. With these three gems as color benchmarks, we compared the remaining Rubies to determine where they fell on the color spectrum from orangy Red to Red to purplish Red.

By comparing a large number of Rubies all at once, my client was able to see how varying amounts of orange and purple affect a Ruby's color. Even more important she was able to decide which shade of red appealed to her most.

We used a similar technique to evaluate and compare the Saturation and Tone of each of the Rubies, creating benchmarks with the least and most saturated (intense) stones and then the stones with the lightest and darkest tones. This allowed our client to see how subtle differences in Saturation and Tone would affect the beauty of her Ruby.

After reviewing the Hue, Saturation and Tone of each Ruby, the client narrowed the initial field of nineteen Rubies to the following seven. These are the Rubies with color that really grabbed her!


The next step was to consider the Cut and Clarity of each of the Rubies. When evaluating a Ruby, Color is the most important factor. The Cut and Clarity are not insignificant, but they are less important than Color in determining value.

Rubies are often native cuts. This means the gems were cut at the source and tend to be cut more for weight and size than beauty. Some gemstone dealers will re-cut the stones they import; however, this is not the norm as it can be risky and costly. When judging the cut of a Ruby you want to note and avoid obvious windows, areas of extinction, misaligned facets, significantly asymmetrical shaped stones, and poor polishing. Improper cutting can affect the value, as well as durability of a gem.

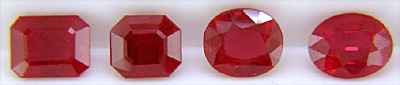
Our client desired an emerald-cut Ruby, but would also consider an oval or cushion-shape stone if it was just the right color. After considering the cut characteristics of each of the remaining Rubies, our client narrowed the field to the following four - two emerald cuts and two oval brilliant-cuts.


The last factor to consider in evaluating Rubies is Clarity. Rubies are in the Type II Clarity Classification which means they typically occur with inclusions. Nearly flawless Rubies are extremely rare and expensive. A flawless Ruby can be rarer than a flawless diamond. Stones with inclusions that are very easy to see under 10x magnification and possibly visible to the naked eye are graded Very Slightly Included (VS) provided the inclusions are not too numerous and do not affect transparency or durability of the stone.

As with Cut, the Clarity grade does not appreciably affect the value of a stone except for flawless and heavily included examples. It is important to analyze the Clarity grade for several reasons:

1. It helps rate the relative quality and value of stones in a group.

2. Inclusions help confirm that a stone is natural and not synthetic. We only work with natural gems.

3. Inclusions can provide evidence of fracture-filling and heat treatment, which in turn affect rarity and value.

After reviewing all of the features of the remaining four Rubies, our client made the final choice. So which Ruby did she select? You may have already guessed, from the several hints I dropped.

................(drum roll).................


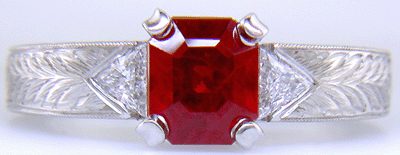
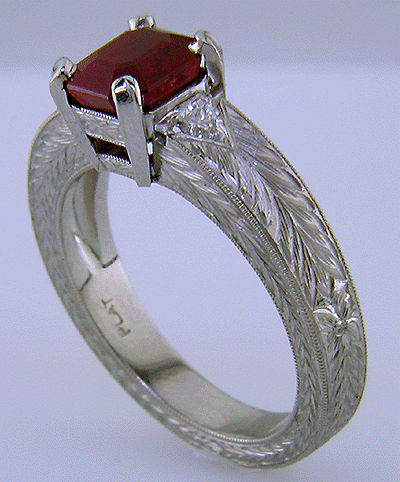
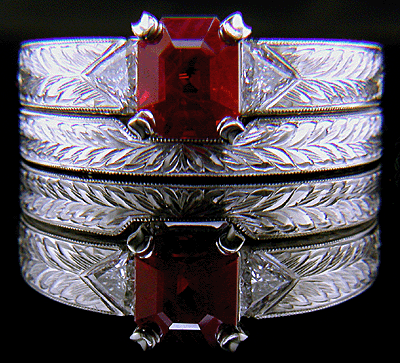
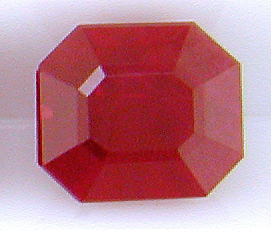
The winner is a 1.58 carat emerald cut with distinctively beveled corners. She loved the nearly pure Red hue of this Ruby, combined with the dramatic geometry of the cut and the stones silky appearance.

We started with 19 beautiful Rubies and through a process of careful elimination found the Ruby that best matched our client's desires. When hunting for an important gemstone it is worth taking the time to view and closely examine an array of gems. In this way you can find the best stone for your custom ring or jewel.


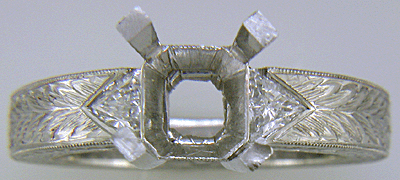
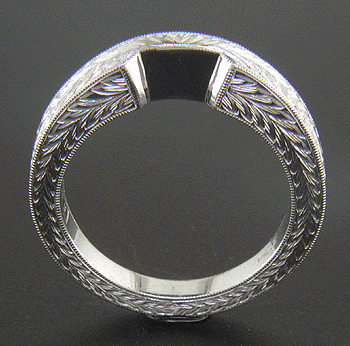
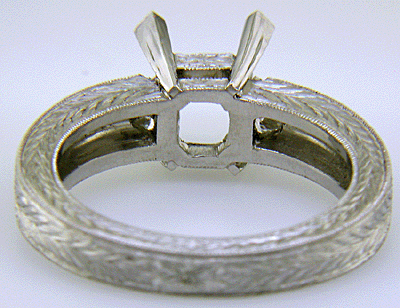
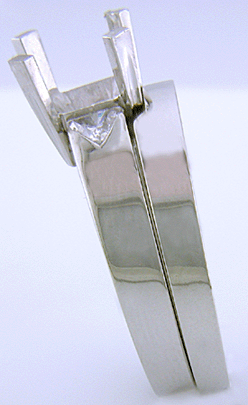
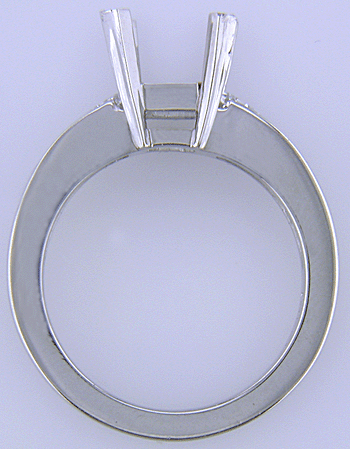
Now that our client has found the perfect Ruby, what's next? The whole process began with our client's desire for a rich red Ruby set in an engraved ring like the ones she had admired on our web site. We still needed to finalize the design, select the side diamonds and hand craft the ring. But that is the discussion for next time. Not to worry ..... I will not leave you hanging too long. Please check back soon for the rest of the story.